
The fastest way to make a page in your article more jazzed and interesting is with a picture and first step to getting it done is to position your cursor in the edit window and click wherever you want the pic to go. It's almost always best to position it on the next empty line in your article since dropping the pic inside existing text is likely to make a mess of formatting.
Click the line at the start as that tells Blogger the last edit or insert point I suppose. Next you click the icon which looks a little like a framed painting since that calls up the routine to identify and load the pic.
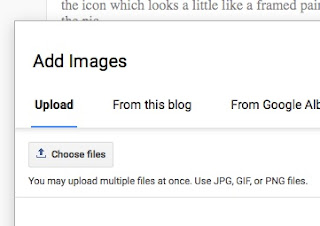
That prompter will come up and from there you click choose files. I'll assume you have the file on your Desktop and you will pick it up from there.

Maybe you want that pic of a storefront for music so there's 6.jpg selected in the window. After you select that you can click Choose to load it.

Now you see your cool storefront so ensure it's surrounded in blue to show it's selected and then click at the bottom Add Selected.
That's when the image will show up in your article but you will probably want to adjust it. To do that, click anywhere on the image and this control bar will come up.

I almost always use X-Large with any pic I'm inserting since that will generally fill the screen from side to side. I'll also usually click Center to ensure it's centered in the window.
After that your pic will be embedded in the article so you can hit return or Enter a few times to push the cursor a few lines before the image and you can start typing again.
You can get clever with the positioning if you but you need a few HTML concepts for it since elements on a page can float. If you make the image position to the left then it will be floated there such that another element such as text or another picture can float to its right. Blogger won't help all that much with getting it right so you may have to dicker with it for a while. Whether it's worth doing that is your call but it can make a pro-looking effect with the pic on the left side of the screen and the descriptive text to its right.
For my taste, mostly I'll enlarge the pic so I don't have to screw with the formatting and you will come to whatever conclusion about using it after you play with it a few times. With the cosplay and your leather work, I know you will have graphics to present so that's a start on making it happen.
Have a ball.
No comments:
Post a Comment